 AbsentMotion
The timeline
Layers as bars in time: scrubbing, trimming, moving, reordering, keyframes, bookmarks and snapping.
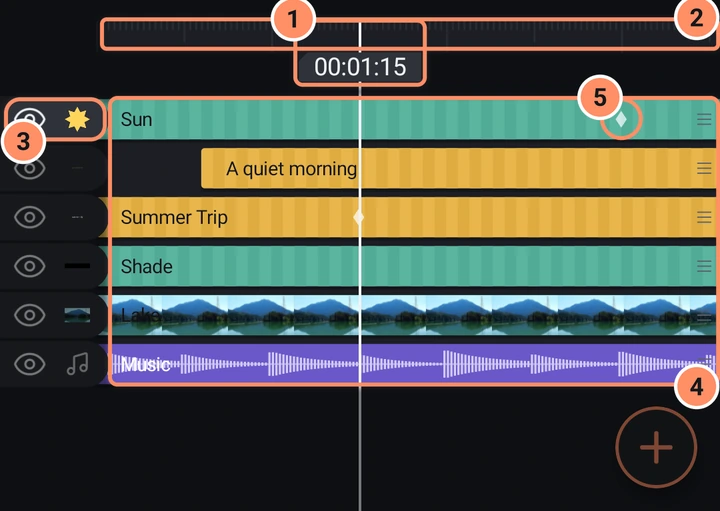
The timeline is the area under the play bar. Each layer is a row with a bar showing when the layer exists.
Reading the timeline
- The playhead is a fixed vertical line in the middle. The content scrolls underneath it. The time pill on the ruler shows minutes, seconds and frames.
- Ruler. Tall ticks mark each second and shorter ones the half seconds and frames, depending on how far you have zoomed in.
- Rows. One row per layer, with the front layer on top. Inside an open group (see Edit Group in Shapes, drawing and masks) only the layers of that group are listed. At the left, the eye shows or hides the layer (a hidden layer is not drawn and its sound is silent) and a tiny picture identifies it.
- Bar colors. Ordinary layers are teal with diagonal stripes, text layers are amber, camera layers are crimson and audio layers are violet with a waveform. Photos and videos show a strip of pictures. The layer name is written on the bar.
- Label colors. The layer menu can mark a layer with one of eleven label colors, shown as a small colored corner on the bar.
- Keyframe diamonds. Small diamonds on a bar are keyframes. They are bigger on the selected layer. While a property or effect is open, only its keyframes show. See Keyframes and easing.
Gestures
| To | Do this |
|---|---|
| Select a layer | Tap its bar or its row. |
| Show or hide a layer | Tap its eye. |
| Deselect | Tap the ruler or an empty area. |
| Move the playhead | Drag left or right anywhere. The movement continues for a moment when you let go and ends on a whole frame. |
| Scroll the layers | Drag up or down. |
| Zoom the timeline | Pinch with two fingers. |
| Trim a layer | Select it, then drag the round grip at the end you want to move. With several clips selected, dragging one grip moves that end of all of them. |
| Move a layer in time | Press and hold its bar until it lifts, then drag. |
| Change the layer order | Press and hold the empty part of a row (not the bar), then drag up or down. You can also drag the three lines at the right end of an unselected row. |
| Move a keyframe | Press and hold its diamond on the selected layer, then drag sideways. |
| Select several layers | Press and hold the eye or the name area of a row and slide up or down. |
| Bookmark | Tap the time pill on the ruler. |
A plain swipe across a bar only moves the playhead. This is on purpose: to move a clip you must press and hold it first, so a clip never moves by accident.
When a video or audio clip reaches the end of its file, the grip turns red and ticks: it cannot be made longer. To make a clip longer, slow it down with the Speed tool (see Photos, video and speed).
Snapping
Trims, clip moves and keyframe moves snap to the playhead, bookmarks, the start and end of other layers and keyframes. A colored vertical line and a small vibration tell you when a snap happens. The vibration can be turned off in Settings.
Bookmarks
Tap the time pill on the ruler to add a bookmark at the current frame. It shows as a pink flag. Tap the pill again at the same spot to remove it. Bookmarks work as stops for the skip buttons and as snap points. Mark Beats (a tile of an audio layer, and an entry in the layer menu) adds bookmarks on the beats of a song: see Audio.
The tools under a selected layer
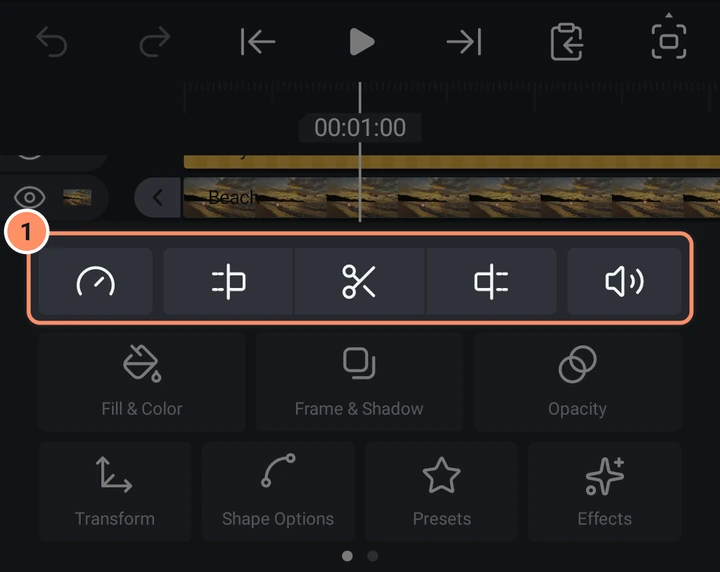
When a layer is selected, a grid of tools appears at the bottom. The first row has five small buttons.
- Speed opens the Time Remapping panel for video and audio clips: see Photos, video and speed.
- Trim start cuts the clip so that it starts at the playhead.
- Split cuts the clip in two at the playhead. The second part becomes a new layer above the first.
- Trim end cuts the clip so that it ends at the playhead.
- Volume opens the volume panel for sound and for videos.
If the playhead is outside the clip, the same buttons change meaning and the one that cannot be used is hidden. Before the clip the row shows Extend the start to the playhead and Move the clip to the playhead; after the clip it shows Move the clip to the playhead and Extend the end to the playhead. Moving the clip makes its start (or its end) jump to the playhead.
The large buttons below are the layer tools.