 AbsentMotion
Layer tools
The grid of tools that appears when you select a layer, and every panel behind it.
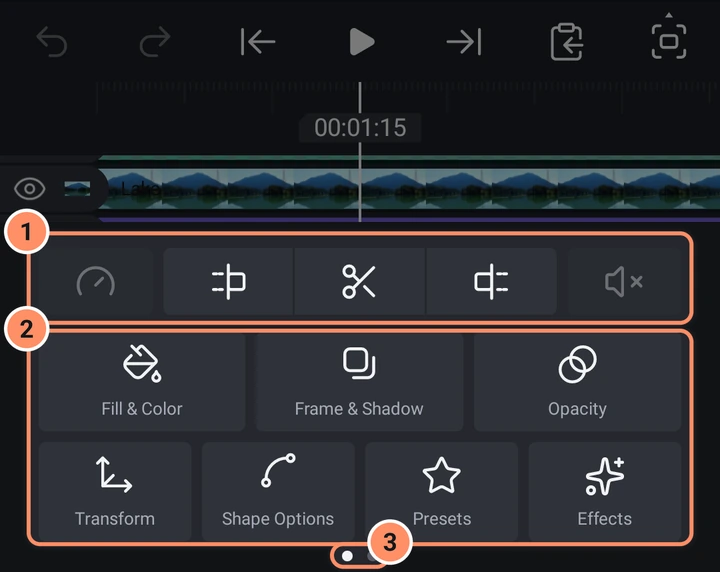
Tap a layer and a grid of tools opens at the bottom. The first row has five small buttons (Speed, trim and split, Volume), described in The timeline. A trim or extend button that cannot be used where the playhead is does not show at all. Under them are large buttons whose set depends on the kind of layer.
The large buttons come in two pages. Swipe the grid sideways to go from one page to the other; two dots under it show which page you are on. A layer with only one page has no dots. On a big tablet the tools sit in the column beside the preview, all on one page, in two to four columns so that they fit.
| Layer | Tools |
|---|---|
| Shape, photo, video | Fill & Color, Frame & Shadow, Opacity, Transform, Shape Options, Presets, Effects |
| Path shape (pen, SVG, many shapes) | The same, with Edit Points instead of Shape Options |
| Text | The same, with Edit Text instead of Shape Options |
| Drawing | The same, with Edit Drawing instead of Shape Options |
| Group | Fill & Color, Frame & Shadow, Opacity, Transform, Edit Group, Presets, Effects. A group linked to an asset has Asset Properties instead of Edit Group; a video cut-out made by Remove Background (video) has Cut-out Edge instead |
| Null | Transform, Presets, Effects |
| Camera | Camera Options, Transform, Effects, Presets, Camera Moves |
| 3D model | Model Options, Opacity, Transform, Presets, Effects |
| Light | Light options, Transform |
| Audio | Presets, Effects (including Voice filters), Mark Beats, AI (Reduce Noise and Auto captions) |
A photo or video is a rectangle with a picture fill, so it has the same tools as a shape.
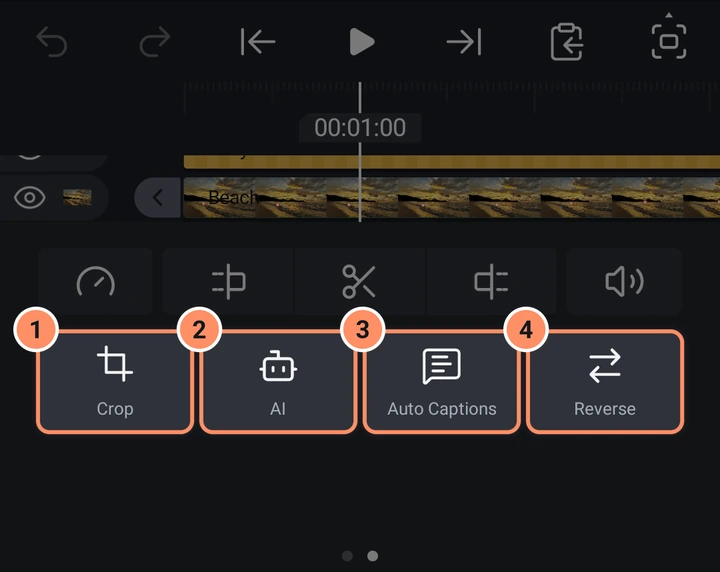
The table lists page 1. Page 2 holds Crop for every layer you can see except a 3D model: shapes, text, drawings, groups, photos and videos. A video clip has four more buttons there: AI, Auto Captions, Reverse and Screenshot; a photo has AI there too. While the project's Depth order is on, page 2 also starts with 3D layer for shapes, photos, videos, text, drawings and groups: see Camera layers and 3D. Audio, camera, light, null and 3D model layers have a single page.
Every panel
Most panels share a narrow column on the left with these buttons: Back, Add keyframe or Remove keyframe, Easing and, in Transform and Effects only, More. A gray keyframe button means the setting cannot be animated. See Keyframes and easing.
Tap any number box to open the number pad. The first tap selects the whole value, so typing replaces it. A tick applies it; tapping outside closes the pad. Rulers (a strip with ticks and a center needle) change a number when you drag sideways.
Transform
Tabs on the right: Move, Rotate, Size, Tilt, Skew, Pivot. For a camera only Move, Rotate and Size work, and Tilt too while Depth order is on; the other tabs are gray. Hold Transform in the tools, or open More, to switch between Basic Controls (Move, Rotate, Size and Skew, the default) and Advanced Controls (all six tabs).
- Move. A trackpad ("Drag here to move the layer") and X and Y boxes. Tap Z to move the layer along the depth axis. Thin red guides show when the layer lines up with the canvas or another layer.
- Rotate. A dial: drag the knob around or tap the degrees to type. When the layer is tilted in 3D, this tab becomes a 3D trackpad: one finger tilts, two fingers twist.
- Size. Width and height boxes and a link button (on by default) that keeps the proportions. For a camera this tab changes the view angle. The link is remembered for each layer and saved with the project, and the ruler keeps gliding after a flick.
- Tilt. X ROTATION and Y ROTATION in degrees, for 3D tilt. See Camera layers and 3D.
- Skew. X SKEW and Y SKEW in degrees.
- Pivot. The point the layer turns and scales around, in pixels from the middle of the layer. Type X and Y, drag the trackpad, tap one of the nine squares for a corner, an edge or the center, or drag the marker on the canvas. The layer and its child layers stay where they are.
- More has Reset Location, Reset Rotation, Reset Scale, Reset 3D Rotation, Reset Skew, Reset Pivot and Reset Transform (all six).
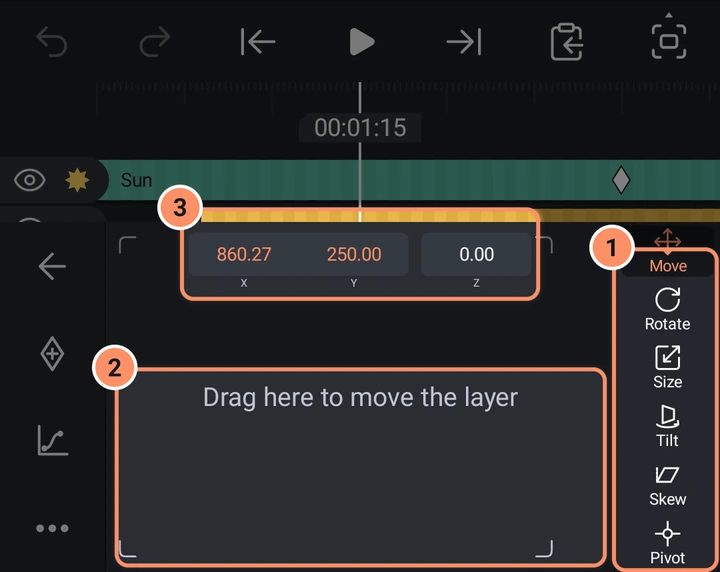
Move is the position, with X, Y and Z animated together. Rotate, Size, Tilt, Skew and Pivot each have their own keyframes; width and height share the Size keyframes.
Crop
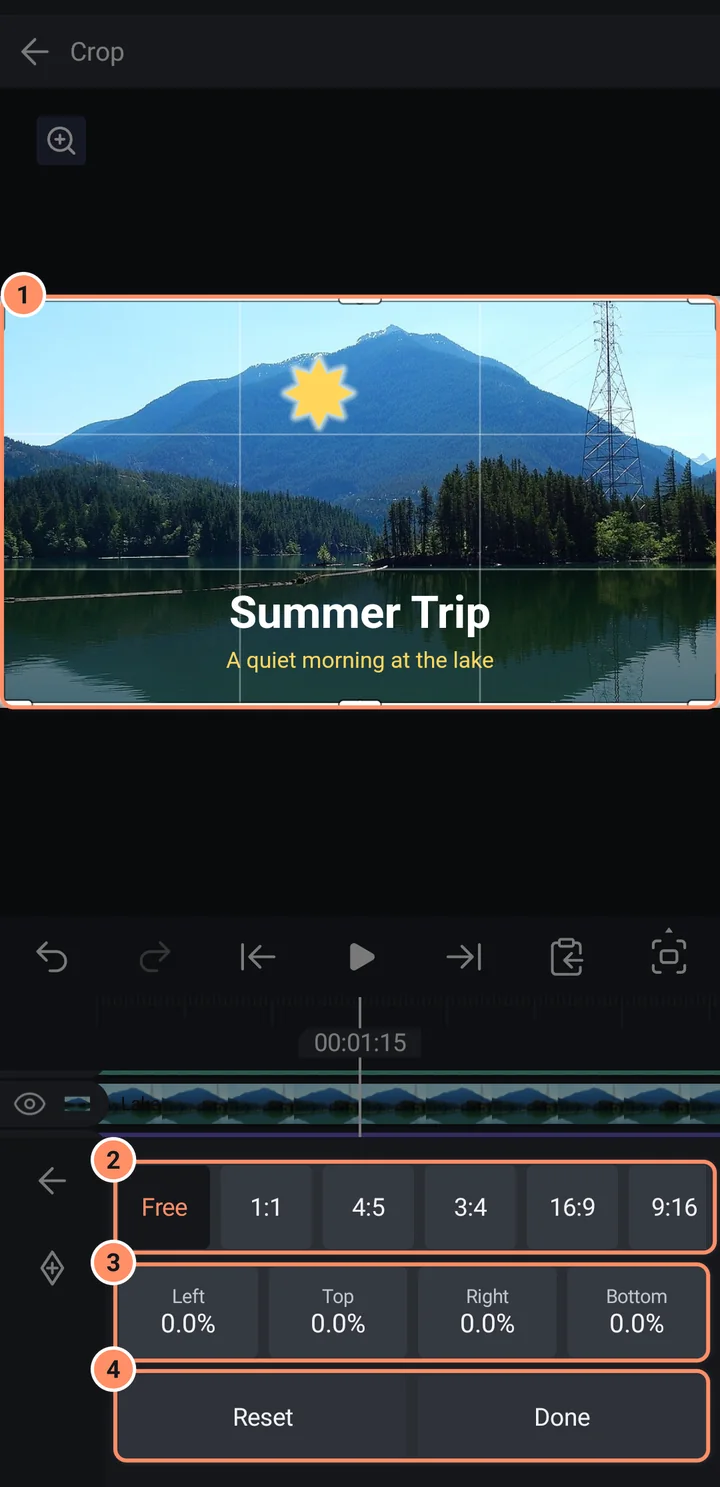
Photos, videos and the other visible layers have a Crop button on page 2 of the tool grid. It dims the part of the layer that will be cut off and shows a frame with eight handles: drag a corner or an edge to crop, or drag inside the frame to move it. Two fingers still zoom the canvas. Free, 1:1, 4:5, 3:4, 16:9 and 9:16 fit the largest centered crop of that shape and keep the shape while you drag. Tap a side to type its value, Reset removes the crop and Done closes the panel. The keyframe button keys all four sides together. The crop is the Crop effect, so you can also change it in Effects, with Roundness and Feather; the layer stays where it is.
Fill & Color
Tabs at the top: None, Color, Gradient, Media.
- Color. The colors of the chosen palette (the Default palette has fourteen), then your saved colors. The bar at the top shows the palette's name, which opens your palettes, and the color as #RRGGBB with its opacity; the + on it saves the current color. Three buttons: Eyedropper (touch the preview to sample a color), Color sliders and Full color picker (a color wheel or HSV and RGB sliders with a hex field).
- Gradient. Pick linear, radial or sweep, then a start and an end color. Two handles on the preview move the gradient. A gradient has exactly two colors.
- Media. Fills the shape or the letters of a text layer with a photo or video. Tapping it opens the picker.
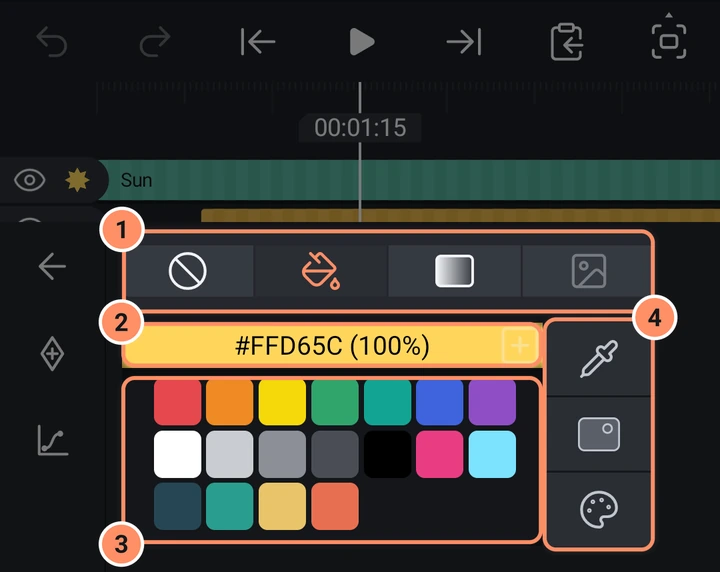
Only the color in the Color tab can be keyframed.
Color palettes
A palette is a set of colors you can use in every project. The color bar in Fill & Color, the Full color picker and the color popup of an effect setting show the colors of the chosen palette. Tap the palette's name there to open Palettes.
- Tap a palette to use it. The pencil opens it to edit.
- New makes a palette with the color you are on. From picture makes one from the 8 main colors of a photo; a palette picture exported from AbsentMotion comes back with every color. From file reads a palette file: GIMP
.gpl, Adobe.aseor.act,.pal, or a list of hex colors, like the palettes you can download from Lospec. - In an open palette, tap the name to rename it, and Use to choose it. Tap a color to select it: Add adds the color you are on, Duplicate copies the selected color and Delete removes it. Sort orders the colors by Hue, Lightness or Saturation.
- Export saves the palette as Picture (PNG) in Pictures/AbsentMotion, or as GIMP palette (.gpl) or Adobe swatches (.ase) in Documents/AbsentMotion. Make a copy makes a copy you can edit, and Delete palette removes it after asking.
- Lock keeps colors from being added, duplicated or deleted until you turn it off.
Eight palettes are built in: Default, Pastel, Neon, Earth, Skin tones, Grays, PICO-8 and Game Boy. They are locked for good: use Make a copy to change one. While a built-in palette is chosen, your saved colors show after its own and the + saves to them. While one of your own palettes is chosen, the + adds the color to that palette, unless it is locked.
On a computer, drop a .gpl, .ase, .act or .pal file on the window: it joins your palettes and becomes the chosen one. Your palettes are saved in backups: see Projects, backup and import.
Frame & Shadow
Three tabs: Stroke, Border and Shadow.
- Stroke is the outline of the shape. It has a switch, a color, a size, the line cap and join, and a style for each end of an open line (arrows, circles, diamonds and more).
- Border lets you stack any number of borders. Each border has a size, a color and a position (INSIDE, CENTER, OUTSIDE). Drag the grip to change their order. Add Border adds one.
- Shadow has a switch, Color, Size, Alpha and Position (X and Y).
Opacity
An opacity slider with a percentage box, and 28 blend modes in seven groups: Normal; Darken (Multiply, Darken, Darker Color, Color Burn, Linear Burn); Lighten (Screen, Lighten, Lighter Color, Color Dodge, Linear Dodge); Contrast (Overlay, Soft Light, Hard Light, Soft Overlay, Vivid Light, Linear Light, Pin Light); Difference (Difference, Exclusion, Subtract, Divide); Color (Hue, Saturation, Color, Luminance); and Mask (Mask, Exclude). Tap a group to open it and tap a mode to apply it. Mask keeps what is below only where this layer is; Exclude removes what is below where this layer is.
Shape Options
The settings that define the shape, one row each with a ruler and a value box. Examples: a Circle has Size; a Rounded Rectangle has Size and Radius; a Polygon has Sides, Radius and Angle; a Star has Points, Outer Radius, Inner Radius and Angle; an Arrow has Start, End, Tail Width, Head Width and Head Length. The selected row is the one the keyframe button animates. Photos and videos use Size here.
Edit Points, Edit Drawing, Edit Text
These open full-screen editors: see Shapes, drawing and masks and Text and fonts.
Edit Group
Opens the group, so the timeline and the preview show only the layers inside it and you can change them. See Shapes, drawing and masks.
Camera Options, Light options and Model Options
See Camera layers and 3D.
Mark Beats
On an audio layer, Mark Beats adds a bookmark on every beat of the sound. It does the same as Mark Beats in the layer menu: see Audio.
Volume
For sound and for videos. See Audio.
AI, Auto Captions, Reverse and Screenshot
These four buttons are on page 2 of a video clip's grid (a GIF counts as a video). AI opens the AI category of the Effects Library; a photo has it on page 2 too (for Remove Background), and an audio layer has the same button on its only page. Auto Captions makes captions for this clip alone: see AI tools. Reverse plays the clip backwards: see Media.
Screenshot saves the clip's frame under the playhead as a picture, at the clip's own full size. It is the plain footage: effects, crop, borders and the layer's position are left out, while trims, speed changes and Reverse are followed. The picture goes to the phone's gallery (Pictures/AbsentMotion) and is added to the project as a new layer above the clip. If you delete that new layer within 10 seconds, the picture is also removed from the gallery. The playhead must be on the clip.