 AbsentMotion
Camera layers and 3D
Fly a virtual camera through your layers, sort layers by depth, light the scene and add 3D models.
Camera layers
A camera layer makes the project three-dimensional: layers have a depth (Z), and the camera decides what is seen. Add one from Add, Object / Asset, Camera. It lasts the whole project, uses perspective with a view angle of 60 degrees, and has focus blur and fog switched off.
The first time you add a camera, a tip says: "To look through the camera, open this panel and turn on Camera View." The Camera View button is in the preview strip (see The editor screen). With it on, you see the project through the camera. Otherwise the cameras show as dark rectangle frames in the preview.
With several cameras, the top-most camera that is active at the playhead is used.
Moving the camera
Select the camera layer. In the preview, drag to pan it and pinch to change the view angle. In Transform, Move, Rotate and Size work for a camera; Size changes the view angle. With Depth order on (see below), Tilt works too: it turns the camera to look up, down or to the side. Tilt is one of the Advanced Controls of Transform (press and hold Transform to switch).
Camera Options
Three tabs:
- Camera View. The Depth order switch and, while it is on, Sort (see below; on a computer it is the last row), a diagram of the view cone, buttons Perspective and Orthographic, a View Angle (0.1 to 179.9 degrees) and a Zoom that follows the angle.
- Focus Blur. A switch, then Focus Distance (with the focus plane shown as "at Z ..."), Depth of Field and Blur Strength.
- Fog. A switch, a Color and the Near and Far distances.
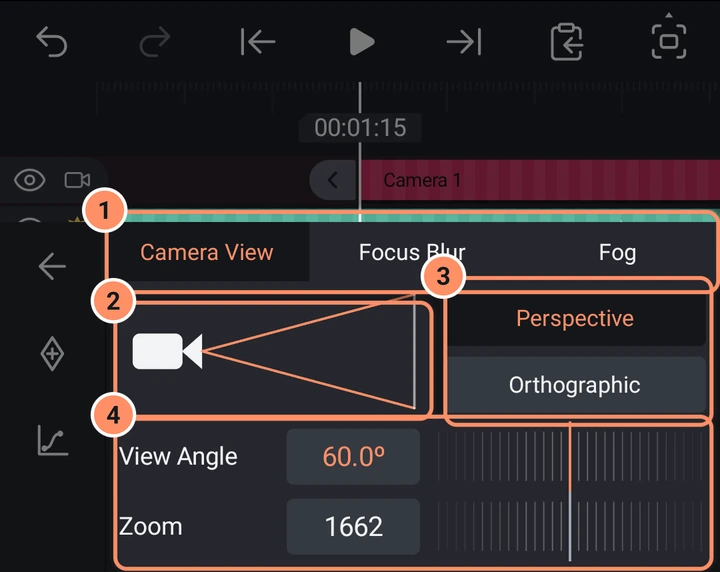
Each row can be animated with the keyframe button.
Camera Moves
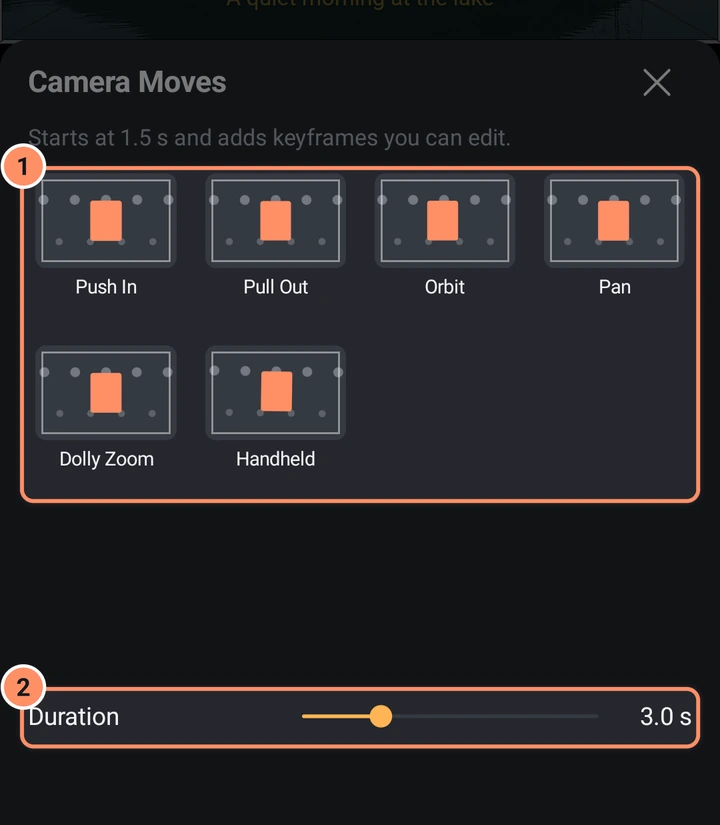
Camera Moves in the tool grid adds a ready-made movement: Push In, Pull Out, Orbit, Pan, Dolly Zoom or Handheld. Each tile has an animated preview. Set the Duration from 0.5 to 10 seconds. The move starts at the playhead and is shortened if the camera layer ends first. Picking another tile or changing the duration updates it, and the result is ordinary keyframes you can edit. With Depth order on, Orbit swings the camera around the scene and turns it to keep looking at the middle, so layers at different depths pass in front of each other.
Depth order
With Depth order on, the camera decides which layer is in front: a layer that is farther from the camera is drawn behind a nearer one, whatever its place in the timeline. As the camera moves, the order changes with it. The switch is at the top of Camera Options, Camera View, and it is saved with the project. New projects have it on. Projects made before version 5.0 have it off, so they keep their look; turn it on to use it.
- A layer takes part when it is in 3D: moved in depth (Z), tilted, a 3D model, Particles with Depth, 3D Scatter or 3D Fracture.
- To let a flat layer take part, select it and tap 3D layer on page 2 of its tools. The tile is there for shapes, photos, videos, text, drawings and groups while Depth order is on, and it lights up when it is active.
- A flat layer keeps its place in the timeline and splits the 3D layers into separate stacks: 3D layers above it in the timeline stay in front of it, and 3D layers below it stay behind it.
- Layers at the same depth keep their timeline order.
- With Sort on By layer, each layer is sorted as a whole. Two layers that pass through each other do not cut into each other: the one whose position is nearer to the camera is drawn in front. The faces of a 3D model and the pieces of an effect are sorted among themselves, not between the pieces of other layers. By piece changes this: see below.
- When the camera tilts or orbits, 3D Scatter, 3D Fracture and the 3D shape effects, such as Cube and Torus, turn with it like other 3D layers. The light on the pieces of 3D Scatter and 3D Fracture stays the same when the camera rolls or zooms.
Sort by piece
Sort, in Camera Options, Camera View while Depth order is on, has two choices. By layer sorts every 3D layer as a whole. By piece sorts the pieces of 3D Scatter and 3D Fracture, the faces of 3D models and the particles of Particles with Depth one by one, together with the other 3D layers in the same stack. Objects that pass through each other then overlap where they should, for example two fractures flying through each other, or a model moving through a cloud of particles. New and older projects start on By layer.
Mix pieces with other layers is a switch on the 3D Scatter, 3D Fracture and Particles cards (Particles only with Depth on) and in Model Options. While Sort is on By piece, it is on for every layer. Turn it off to keep that layer whole: it is then sorted as one item at its own depth. Turning it on also turns on Depth order and By piece for the project, so one switch is enough.
What By piece does not do:
- Pieces that cut through each other are not split. Each piece, face or particle is placed by the depth of its middle, so a piece that cuts through a plane shows fully in front of it or fully behind it.
- Groups do not mix. Pieces only mix at the top level of a project: a group is sorted as one whole, and nothing inside it mixes. The switch is not shown inside a group.
- Some layers stay whole and sort as one item: layers with a shadow, a border, a clipping mask, a Repeat, Echo, Motion Blur or True Motion Blur; 3D Scatter and 3D Fracture with an effect after them (other than Move and Text effects); particles and models with other effects; and layers that the camera's Focus Blur blurs or its Fog tints.
- A flat layer still splits the 3D layers into stacks, as above. Pieces only mix within one stack.
Light layers
Add, Object / Asset, Light adds a light. Like a camera, it lasts the whole project, and it is never drawn itself. Lights shade 3D models and the pieces of 3D Scatter and 3D Fracture.
Select the light and tap Light options:
- Ambient lights every side the same. Directional (the default) shines from one direction, like the sun. Point shines out from where the light is, like a bulb, and gets weaker farther away.
- Color, and Intensity from 0 to 4 (default 1).
- Falloff (Point only, 0 to 100, default 1) is how fast the light gets weaker with distance.
All of them can be animated with keyframes. A new light starts in the middle, in front of the scene, and shines at it. Use Transform to move a Point light (Z included) and to turn a Directional light with Rotate and Tilt.
Up to four lights work at the same time. As soon as a light is in use, the lights replace the light settings of 3D models (in Model Options) and of 3D Scatter and 3D Fracture. A project without light layers looks exactly as before. Tip: add an Ambient light next to a Directional one, so the sides that face away are not black.
Tilt a layer in 3D
Any layer can be tilted around the X and Y axes. Open Transform and the Tilt tab, which has X ROTATION and Y ROTATION in degrees. Dragging on the preview while Rotate or Tilt is open tilts the layer too.
When a layer is tilted, animated in tilt, is a 3D model or has a 3D effect, the Rotate tab turns into a 3D trackpad ("Drag here to rotate in 3D") with X, Y and Z ROTATION boxes. One finger tilts the layer and two fingers twist it. Reset 3D Rotation in the More menu puts it back.
3D effects
The effects in the 3D category turn a layer into a solid: Cube, Box, Hollow Box, Cylinder, Ellipsoid, Torus, Pyramid, Octahedron, Hexagonal Prism, Star Prism, Star Polyhedron, Heart, Three-axis Cross, Raster Extrude, Flip Layer, Spherize and Tunnel. When one is present, the Rotate and Tilt controls change that effect's rotation. See the effects library.
3D models
Add, Object / Asset, 3D Model loads an .obj, .glb or .gltf file. If the model has material and picture files, pick them together with the model. The files can total up to 256 MB, and a model with more than 50,000 triangles is shown in a simplified form (the app tells you).
Model Options has Size, Auto-rotate, Light Angle, Ambient Light and Light Intensity, all animatable. The three light settings are not used while the project has a light layer. A model also has Transform (including 3D rotation), Opacity, Effects and Presets.