 AbsentMotion
The editor screen
The top bar, the preview, the play bar and how the pieces fit together.
The editor has four parts, from top to bottom: the top bar, the preview, the play bar and the timeline with its tools. Tablets get their own layout: see On a tablet below.
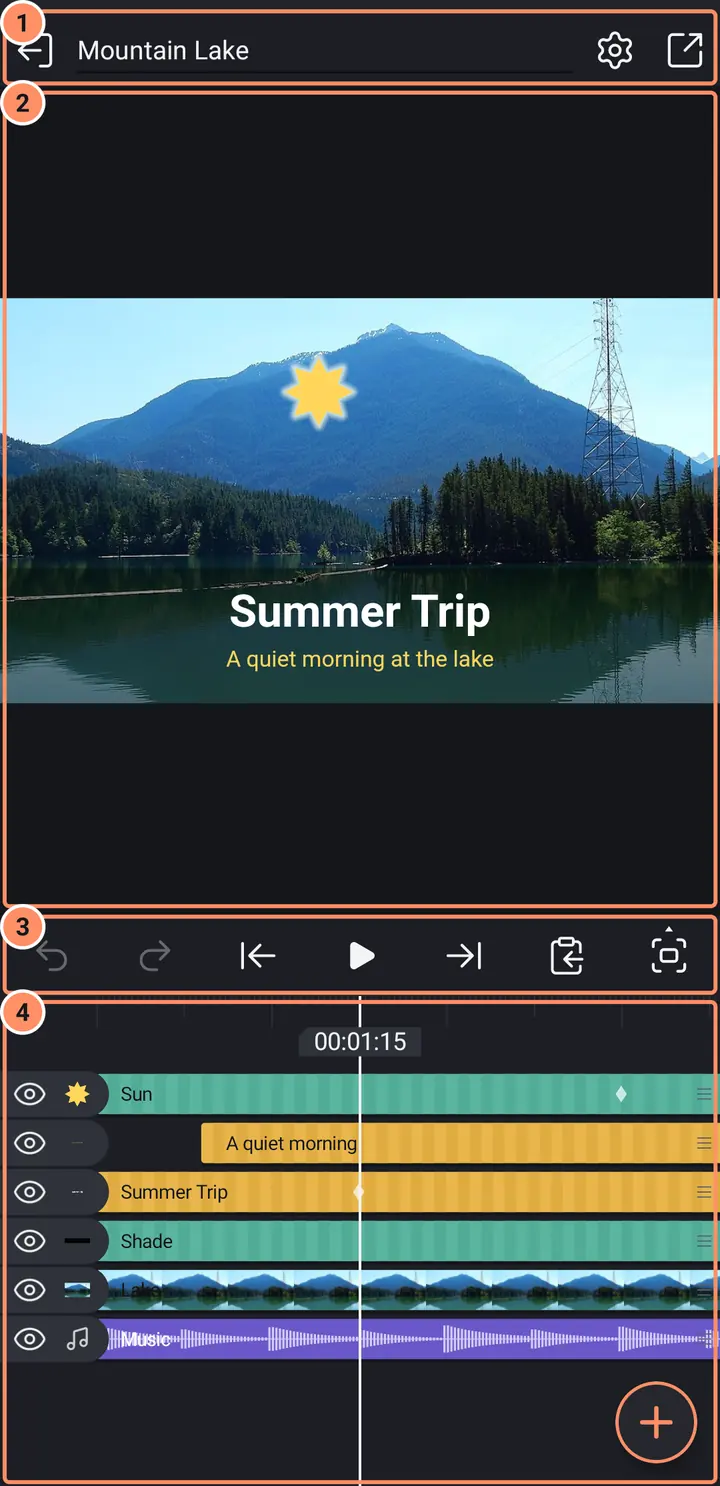
Changes are saved automatically a moment after each edit. A version of the project is also kept every two minutes while you edit (see Projects, backup and import). The top layer in the timeline is the front layer, and new layers are added at the front.
The Back button of the phone steps back one level at a time: it closes the preview strip, clears a multi-selection, closes the easing graph, leaves an open effect, leaves a panel, deselects the layer, leaves an open group and only then leaves the editor.
The top bar
What the top bar shows depends on what is selected.
Nothing selected
- Exit to project list, at the left.
- The project name. Tap it to rename the project.
- Project settings (the gear): see below.
- Export & Share (the share icon): opens the Export screen.
A layer selected
- Back deselects the layer.
- The layer name. Tap to rename; this is also the label on its timeline bar.
- The parent button (a dashed square, a solid square and a small circle). It lists "None" and every other layer. Choosing one makes that layer the parent: the selected layer then follows it when it moves, turns or scales, and keeps its place on screen when you set it.
- Delete layer (the trash can) deletes at once, with no question. Undo brings it back. Children of the layer are released.
- Layer menu (three dots): see Layer menus and multi-select.
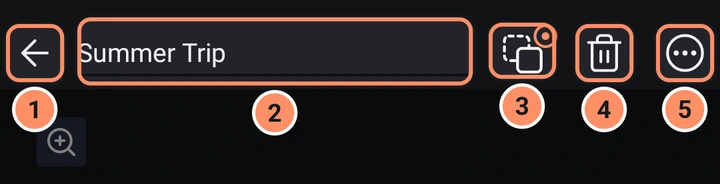
A panel open. The top bar shows a back arrow and the panel's name, such as Transform, Fill & Color or Effects.
Inside a group. After Edit Group, the top bar shows the path instead of the project name: the project name, then the name of each open group. Tap the project name to go back to the whole project, or a group's name to go back to that group. With a layer selected, a small pill with the group's name next to the layer name leaves the group. The gear is hidden inside a group. See Shapes, drawing and masks.
Project settings
The gear opens a sheet with the same options as the new project sheet: the shape (16:9, 9:16, 4:5, 1:1, 4:3 or a custom ratio), Resolution, Frame Rate and Background. Changing them only changes the canvas; your layers are not rescaled. The change can be undone. The Version history row has an Earlier versions button.
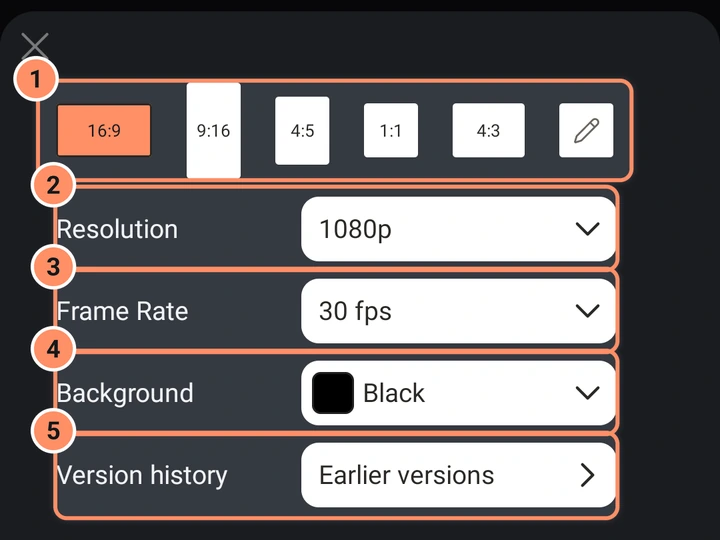
For an Asset project the sheet also has Precompose and Re-timing: see Assets, templates and presets.
The preview
The preview shows the canvas. A transparent background shows as a checkerboard.
- Select. Tap a layer to select it (the top layer under your finger). Tap empty canvas to deselect.
- Move. Drag anywhere on the preview to move the selected layer, not only on the layer itself.
- Scale. The selected layer has a white outline with eight round handles. Dragging a corner scales the layer evenly; dragging a side stretches it in that direction. Pinching with two fingers also scales. The handles scale around the pivot (Transform, Pivot), which stays still.
- Rotate. There is no rotate handle and no two-finger twist for ordinary layers. Use Transform, Rotate (see Layer tools).
- Camera layers. Dragging pans the camera and pinching changes its view angle.
- Text. In the text editor, the handle at the side of the text frame changes the wrap width.
- Guides. While you move a layer in Transform, thin red lines appear when it lines up with the center of the canvas or with another layer.
Zoom and pan the canvas
With nothing selected, two fingers pan and zoom the canvas (from 1 % to 6400 %). With a layer selected, tap the small magnifier at the top left of the preview to turn on pan and zoom mode; then two fingers zoom the canvas while one finger still moves the layer. Double-tap with two fingers to go back to 100 %, and again to return to the previous view.
The preview strip
The last button of the play bar (Preview mode) opens a narrow strip at the right edge of the preview with these buttons, from top to bottom.
- Pixel preview shows hard-edged project pixels, useful when zoomed in.
- Grid overlays a grid every 40 project pixels.
- Solo the selected layers hides every other layer. Tap again to draw the other layers at half opacity, and a third time to turn it off.
- Camera View looks through the camera layer (available when the project has one).
- Full, Half or Quarter: the preview quality. Lower is faster on a slow phone and does not change your export. It is the same setting as Preview Quality in Settings.
- Fast Blur or Full Blur: how the motion blur effects are previewed. Fast is an approximation; Full is accurate and slower. Exports are always accurate.
- Zoom: plus and minus buttons and the current percentage.
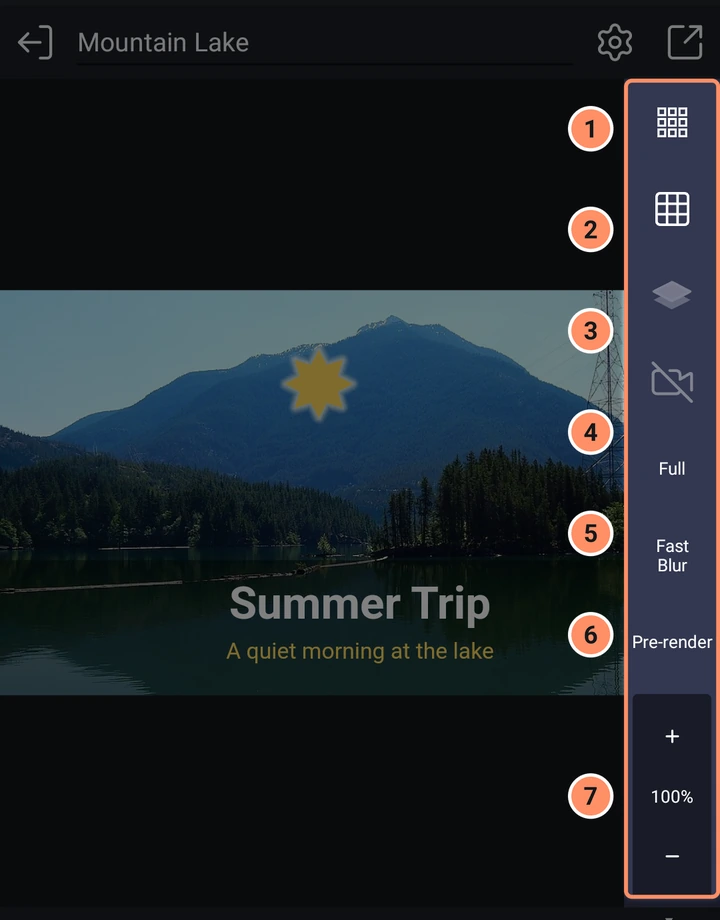
Pre-render, between Fast Blur and Zoom, renders the project ahead from the playhead to the end (or as much as fits in memory and storage), so a heavy project plays smoothly. A note at the top of the preview shows the progress with a Cancel button. While playback uses the pre-rendered frames, a small Pre-rendered label shows at the top right of the preview. Any change to the project makes the pre-render out of date: the Pre-render button in the strip changes color and a note offers Pre-render again. When it is ready, tap Pre-render to see the time it covers, or press and hold it to remove it. Even without Pre-render, the app prepares frames around the playhead whenever you pause (see Settings); a thin green line at the bottom of the time ruler marks them.
Other things on the preview
- The round Animate button at the bottom right appears when a visual layer is selected: it opens In, Out and Loop animations. See Transitions and animations.
- The Undid/Redid note at the bottom shows what the last undo or redo did.
The play bar
Seven buttons, left to right.
- Undo and 2. Redo. The app keeps up to 200 steps. A whole drag or slider move counts as one step. Each undo or redo shows a short note such as "Undid: Move".
- Skip back and 5. Skip forward jump to the previous or next stop. With nothing selected the stops are the start and the end of the project; with a layer selected they are its start, its end and its keyframes. Bookmarks are always stops.
- Play / Pause. Press and hold Play while stopped to turn looping on or off. Playing from the end starts again at the beginning.
- Copy and paste opens a menu for duplicating, copying, pasting and saving presets: see Layer menus and multi-select.
- Preview mode opens the preview strip.

The thin line under the bar is a live level meter while the project plays: the left half shows the left channel and the right half the right channel, green, then yellow, then red as the sound gets louder. A half flashes red if its side clips.
Multi-select
Press and hold the eye or the name area of a layer's row and then slide up or down to select several rows at once; afterwards a tap toggles rows. The top bar changes color and shows group, effects, delete and alignment buttons, and a bar appears at the bottom with clip-timing commands. They are all described in Layer menus and multi-select.
On a tablet
A tablet uses a wider layout whenever its screen is wide enough, in portrait and in landscape (most 10 and 11 inch tablets both ways, smaller ones when held sideways).
- The panels and the tools of a selected layer open in a column beside the preview, so they never cover the timeline.
- The timeline gets the whole width under the preview. In portrait it takes the lower part of the screen, so many more layers fit.
- The tools fit on one page, in two to four columns.
On a smaller tablet held upright the editor looks like the phone's, and sheets such as the color picker, presets, About and Help open as a card in the middle instead of filling the screen. The home screen also gets a grid of projects and templates and puts the tools side by side: see The home screen.