 AbsentMotion
Keyframes and easing
Animate any value over time, move and retime keyframes, shape the motion with easing curves.
On this page
A keyframe stores the value of one property at one moment. Between two keyframes the app calculates the values in between, which makes the animation. Almost every value can be animated: position, size, rotation, tilt, skew, opacity, colors, stroke, border and shadow settings, shape parameters, camera and model settings, volume, and the settings of effects.
Add and remove keyframes
- Select a layer and open a panel, for example Transform, Opacity or Effects.
- Put the playhead at the time you want.
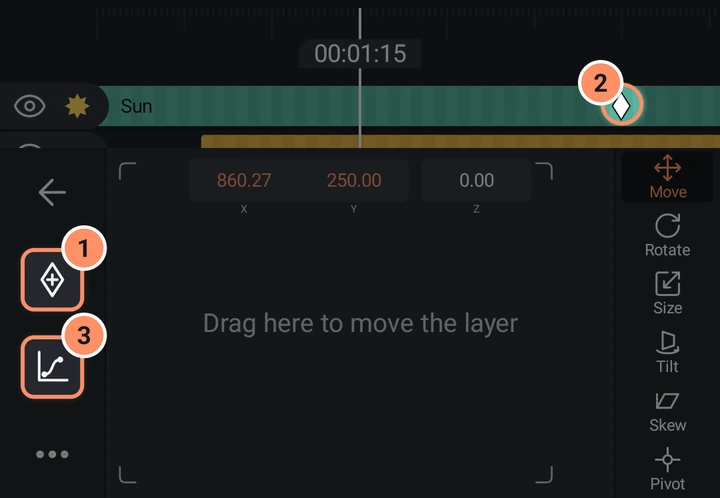
- Tap the Add keyframe button (a diamond) in the left column of the panel. It turns into Remove keyframe while the playhead sits on a keyframe.
Good to know:
- Once a property has a keyframe, changing it at a time with no keyframe makes one there for you. You only need to add the first one by hand.
- Removing the last keyframe of a property leaves it fixed at that last value.
- The keyframe button is grayed when the setting cannot be animated. Text content and size, and freehand drawings, have no keyframes. Shapes drawn with points have their own shape keyframes: see Shapes, drawing and masks.
- In a panel with several rows (Shape Options, Frame & Shadow, Camera Options), the selected row is the one that receives the keyframe. In Transform, Move animates X, Y and Z together; Size, Rotate, Tilt, Skew and Pivot are separate. A Pivot keyframe also keys the position, so the layer stays where it is.
- In Effects, each parameter of an open effect has its own keyframes. Tap the name of the parameter to make it the target.
Keyframes on the timeline
Keyframes show as small diamonds on a layer's bar. On the selected layer they are larger, and the one under the playhead has a ring. While a property or an effect is open, only its diamonds show; with the tool grid showing, all the layer's diamonds show.
- Jump between them. Skip back and Skip forward in the play bar stop at the keyframes of the selected layer (only the open property's or effect's when one is open).
- Move a keyframe (retime). Press and hold a diamond on the selected layer until it lifts, then drag sideways. It snaps to the playhead, bookmarks, other layers' ends and other keyframes, and stays inside the clip. One move is one undo step. If no property or effect is open, all of the layer's keyframes at that frame move together; if one is open, only its keyframes move. Adding a second finger cancels the move.
- Speed has no keyframes of its own. Change it over time with a speed curve: see Photos, video and speed.
There is no copy and paste for a single keyframe. To reuse keyframes, copy the whole layer (they travel with it), copy an effect, or save a preset.
Easing: the shape of the motion
By default a value moves in a straight line from one keyframe to the next. Easing changes how fast it moves in between.
Tap Easing (the curve button) in a panel. A graph opens for the segment that ends at the next keyframe. The playhead has to be between two keyframes of the property; otherwise the app asks you to add keyframes first.
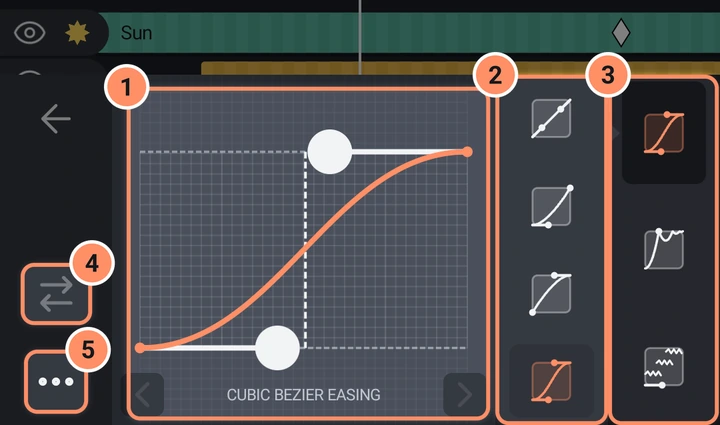
- Drag the handles on the graph to change the curve. A dashed line shows where the playhead is inside the segment, and the arrows under the graph move to the previous or next segment.
- Pick a kind of curve:
| Kind | What it does |
|---|---|
| CUBIC BEZIER EASING | A smooth curve with two handles. Presets: Linear, ease-in, ease-out, ease-in-out. |
| BOUNCE | Bounces at the end like a ball. |
| ELASTIC | Overshoots and springs back. |
| CYCLIC | Repeats a wave. |
| RANDOM | Jumpy random movement. |
| STEPS | Jumps in steps instead of moving smoothly. |
| ELASTIC STEPS | Steps that overshoot. |
- Reverse the curve mirrors the curve (not available for Linear).
- More has Copy Curve and Paste Curve (paste to the current segment), Apply Curve to All Keyframes, and Enable Overshoot or Disable Overshoot (Cubic Bezier only). Overshoot widens the graph so the handles can go past the start and end values, which makes the motion swing past its target and come back.
Ready-made animation
You do not have to build every animation by hand. These all write ordinary keyframes or effects that you can edit afterwards.
- Animate (round button at the bottom right of the preview): In, Out and Loop animations. See Transitions and animations.
- Transitions between two clips.
- Camera Moves such as Push In and Orbit. See Camera layers and 3D.
- Move effects such as Auto-Shake, Oscillate, Swing and Spin: see Using effects.
- Presets you saved from another layer.