 AbsentMotion
Shapes, drawing and masks
Shapes, the pen tool, freehand drawing, SVG import, clipping masks, groups, parents and animated shape masks.
On this page
Shapes
Add a ready-made shape from the Shape tab of the Add menu. Select it and tap Shape Options to change it. Every option can be animated with keyframes.
- Round Corners comes first and rounds every corner of the shape. Rounded Rectangle, Callout and Stamp use their own corner radius here.
- Size sets the width and height.
- Then come the options of that shape, for example the teeth of a Gear, the notch and point of a Heart, the border, camera and side buttons of a Phone, or the border, header and grid of a Panel. Counts such as teeth, rays or points change in whole steps.
- Advanced opens the less common options, such as the sweep of a Ring or the columns and rows of a Panel.
Edit Points in the tool grid turns the shape into points you can move, with the look it has at that moment. Round Corners keeps working, and Undo brings the options back. If some options are animated, the app asks first. Convert to Outline in the layer menu does the same. Shapes made with the pen tool or imported from SVG keep Edit Points as their main tool; their Shape Options offer Round Corners.
Older versions of AbsentMotion show these shapes as they look at the start of the layer, without the options.
Color and outline are set with Fill & Color and Frame & Shadow. See Layer tools.
The pen tool and Edit Points
Pen Tool in the Add menu creates a new shape layer and opens the point editor. Edit Points in the tool grid opens it for an existing path shape. In the preview, tap to place a point; press and drag to pull out a curve handle. A ghost point shows where the next point will land. Leaving without drawing anything deletes the new layer.
At the bottom of the editor:
- Close the path or Open the path (needs two or more points).
- Make the point curved or Make the point sharp.
- Add point and Delete point.
- A trackpad that moves the selected point ("Drag to move the point"), and when you edit a handle of a smooth point, the toggles Angle and Distance lock its angle or its length.
- Contour with arrows moves between the separate sub-paths of a shape.
- A list of the points on the right, with small "+" cells between them for inserting a point.
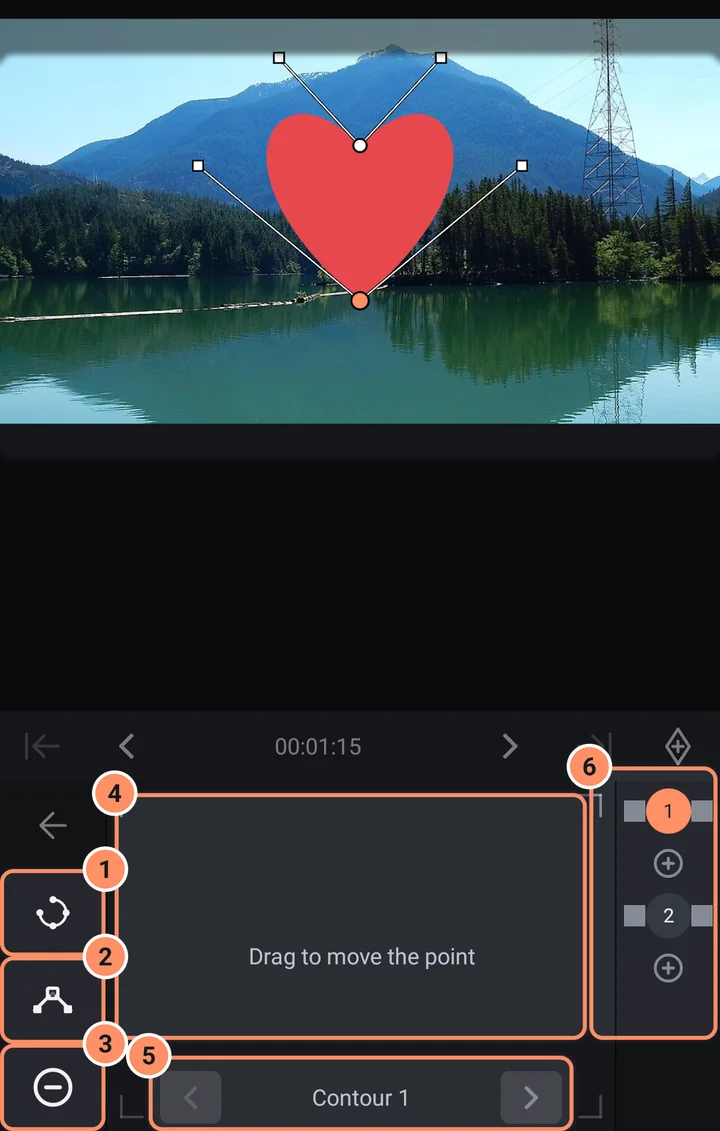
The top has Undo, Redo and Back.
Animated shapes (shape keyframes)
In the point editor, a time bar has Previous shape keyframe, Next shape keyframe, Add shape keyframe and Remove shape keyframe. A shape keyframe stores the whole shape at the playhead. Move to another time, change the points, add another keyframe, and the shape animates between them. The previous keyframe shows as a faint dashed outline to help you line up. This is how you make an animated mask for rotoscoping: trace an outline around something in a video and change it as the video moves.
Freehand drawing
Freehand Brush in the Add menu creates a drawing layer and opens the drawing editor.
- Pen draws an even line, Brush changes the line width with pressure, Fill turns a loop you draw into a filled shape, and Eraser removes parts.
- A size slider (1 to 300), and a color picker with a hue strip and an opacity strip.
- Undo and Redo at the top. Each stroke is kept when you lift your finger.
- The tool, size and color are remembered. Leaving without drawing anything deletes the new layer.
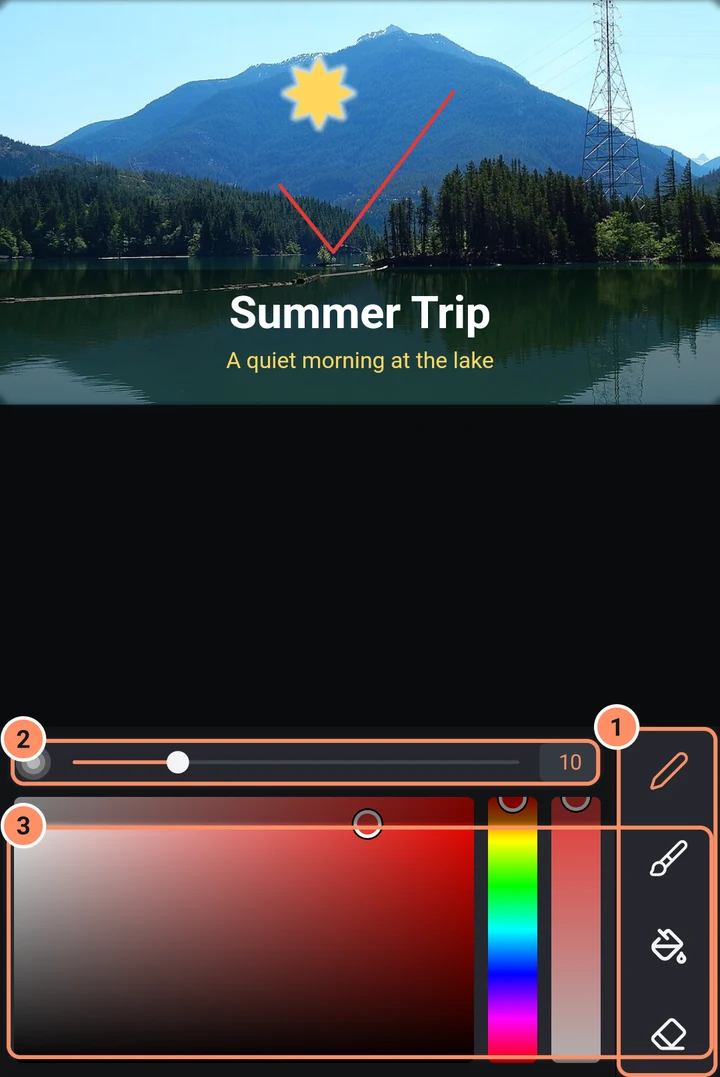
Drawings have no keyframes. To animate a drawing, use effects such as Drawing Progress; see the effects library.
SVG files
Import SVG in the Add menu turns a vector image into shapes. See The Add menu for what is kept.
Masks and clipping
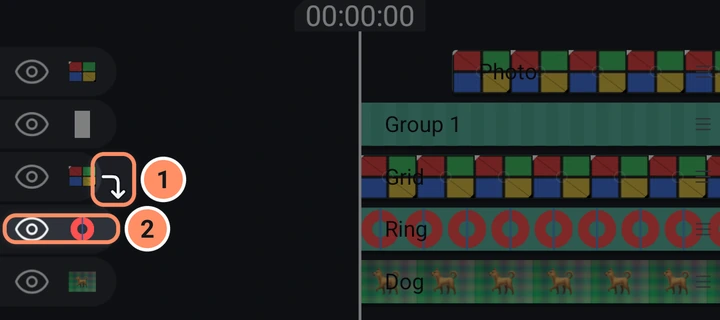
- Create Clipping Mask (layer menu) clips a layer to the shape of the layer directly below it. Release Clipping Mask undoes it. In the timeline, a clipped layer shows a small hooked arrow at the end of its row that points down to the layer it is clipped to.
- Group & Mask and Group & Exclude (multi-select) group layers and set the top layer's blend mode to Mask or Exclude. You can also set the blend mode Mask or Exclude on any layer in Opacity. Mask keeps the content below only where the layer is; Exclude cuts it away.
- Animated masks come from shape keyframes (above).
- Remove Background for photos and videos is described in AI tools.
Groups and parents
- Group (multi-select) puts layers into one group layer. Move, scale, fade and add effects to the group as one. See Layer menus and multi-select.
- A parent (the parent button in the top bar) makes one layer follow another without grouping. The Move effects Parenting Helper and Scale Assist change how a child follows its parent: see Using effects.
- A Null layer (Add, Object / Asset) is invisible. Make it the parent of other layers to move them all together, or let motion tracking move it.
Edit a group
Select a group and tap Edit Group in its tools to open it. Inside, the timeline and the preview show only the layers of that group, and you change them like any other layers. You can open a group inside a group too.
- The top bar shows where you are: the project name, then the name of each open group. Tap the project name to go back to the whole project, or a group's name to go back to that group.
- With a layer selected, a small pill with the group's name sits next to the layer name. Tap it to leave the group.
- With nothing selected, the phone's Back button leaves the group you are in.
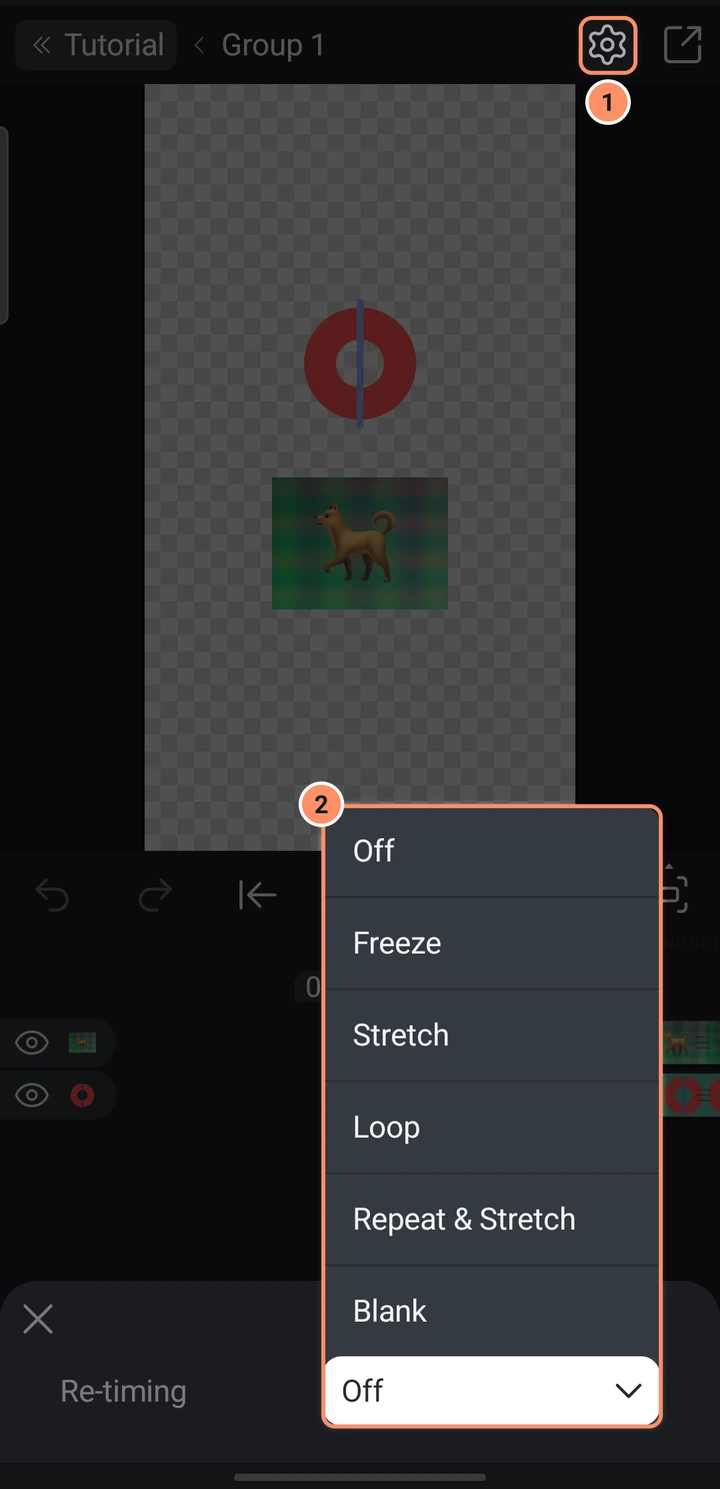
- The gear opens the settings of the group you are in. They have one setting, Re-timing: see below.
A group that is linked to an asset opens with Asset Properties instead: to change its layers, open the original asset or use Unlink from Asset first (see Assets, templates and presets). A video cut-out made by Remove Background (video) cannot be opened.
Re-timing a group
Re-timing decides what plays when the group clip is longer or shorter than the layers inside it. Open the group (Edit Group), tap the gear and pick:
- Off (the default): the layers play at their own speed and stop where they end.
- Freeze: the last frame of the middle part stays on screen.
- Stretch: the layers slow down or speed up to fill the group clip.
- Loop: the layers play again from the start.
- Repeat & Stretch: the layers repeat a whole number of times, stretched a little to fill the clip exactly.
- Blank: nothing shows after the layers end.
Inside a group, the copy and paste menu also has Set intro end and Set outro start. They put gold flags on the ruler: the part before the intro end and after the outro start keeps its real speed while the middle is stretched, looped or frozen.
Ungroup
Ungroup in the layer menu of a group puts its layers back into the project, where they were in time and on screen. If the group has its own effects, speed, opacity or blending, the app warns that these are removed before it ungroups. Undo brings the group back.