 AbsentMotion
Using effects
Add, stack, reorder, hide, copy and animate effects, and find the right one in the effects library.
On this page
An effect changes how a layer looks or moves: a blur, a glow, a color change, a shake. A layer can have as many effects as you like. AbsentMotion has 216 effects in twelve categories. The effects library on this website lists every effect with all of its settings.
Add an effect
- Select a layer.
- Tap Effects in the tool grid.
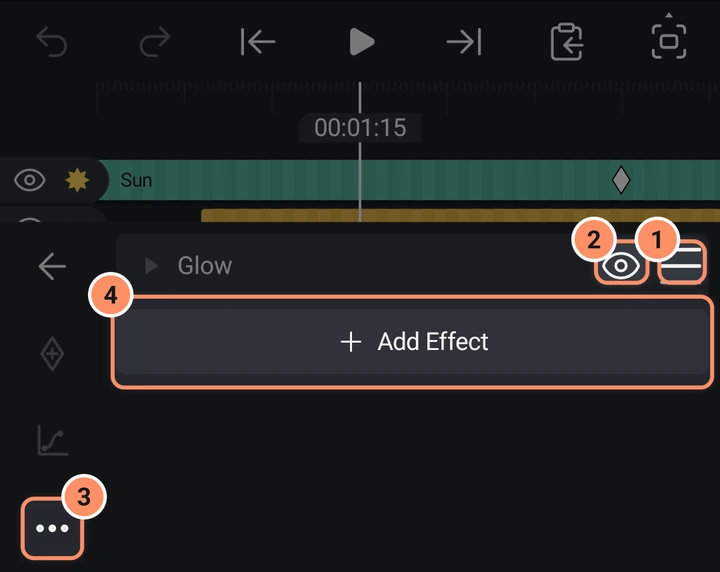
- Tap Add Effect at the end of the list. The Effects Library opens.
- Tap an effect. It is added with its standard settings and its settings open at once.
To read about an effect first, press and hold its tile. A page opens with an animated preview, a description, a star to mark it as a favorite, + Standard Settings and, for a few effects, ready-made presets.
The Effects Library
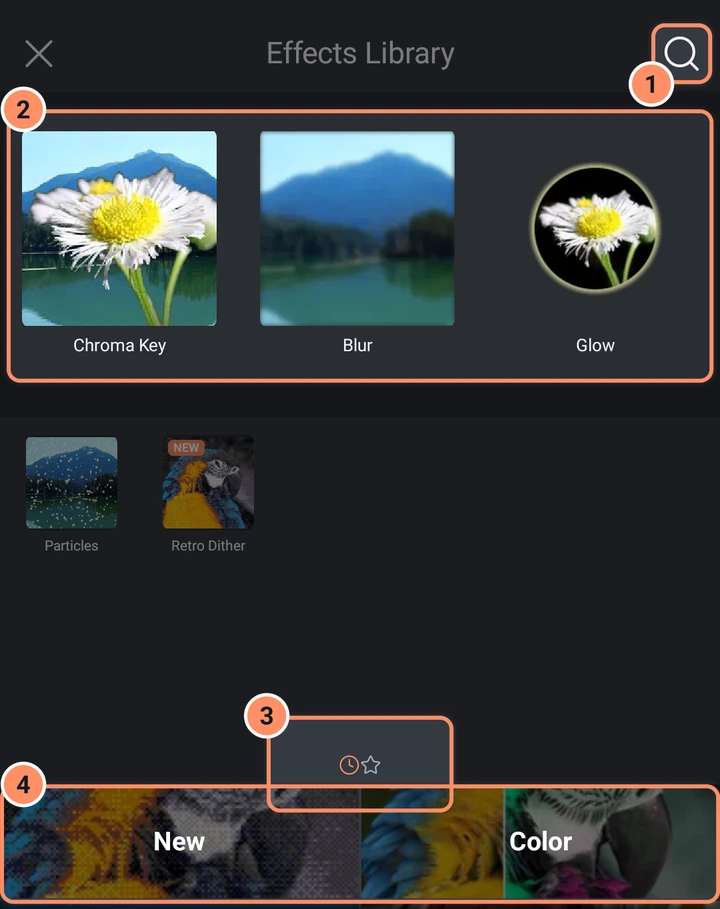
- The top has a search box ("Search") that matches names first, then descriptions, and also finds AI tools and presets.
- A strip of recommended effects (Chroma Key, Blur and Glow), a grid of your Recent or Favorite effects, then the categories. To switch between Recent and Favorite, tap the two small icons, swipe left or right on the grid, or press and hold the icons until the phone vibrates and slide your thumb (right for Favorite, left for Recent).
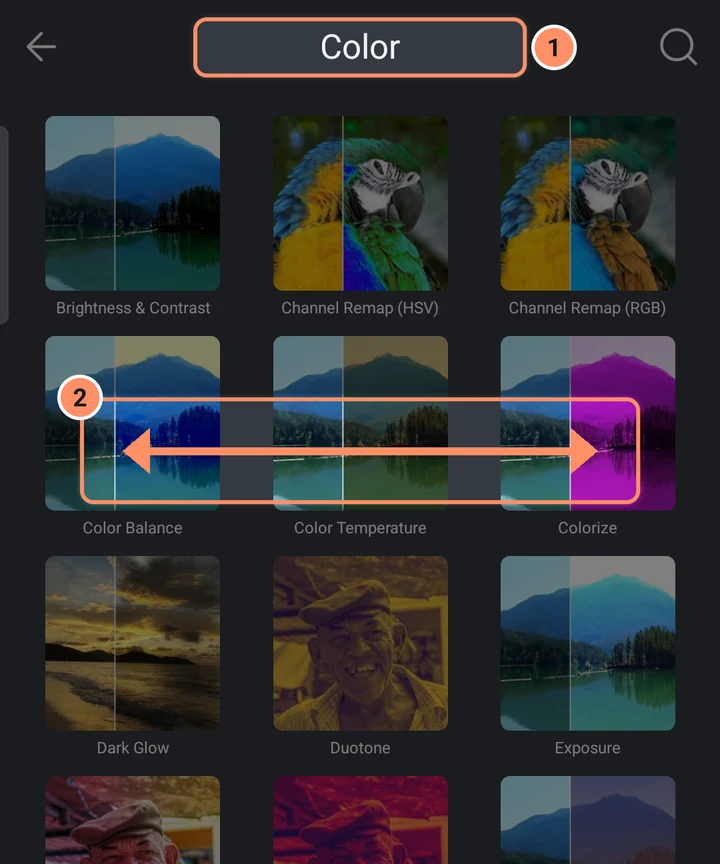
- Categories: Color, Blur, Distort, Stylize, Noise, Repeat, Key, Move, Beat, 3D, Text and Other. A New category lists the effects added in the newest big version (5.x). An Audio category appears for layers that have sound, and AI holds the AI tools.
- An effect that cannot run on your phone is grayed out.
- Inside a category, swipe left for the next category and right for the previous one.
Settings of an effect
Tap an effect in the list to open it. Its header has the effect name, a three-dot menu and a trash can.
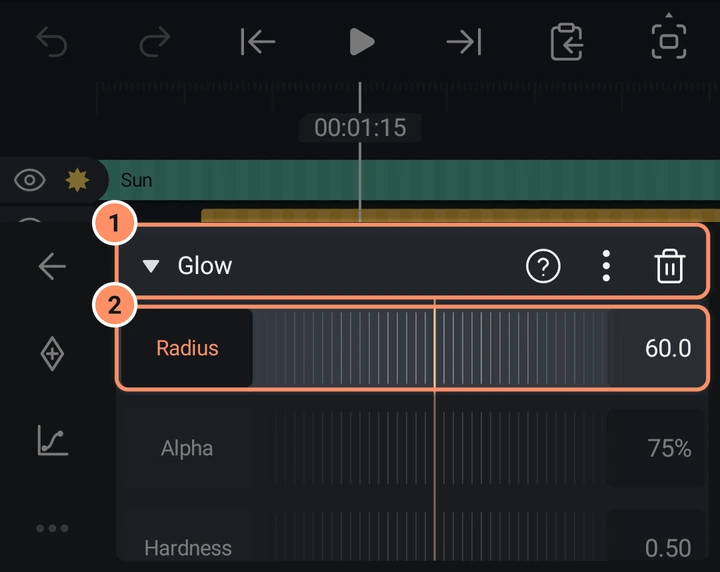
- Each number has a ruler and a value box. Tap the name of a setting to make it the target of the keyframe button. Settings that are positions can be moved by dragging on the preview.
- A color setting opens a row of quick swatches and a field for the exact color. The popup also shows the name and the colors of the chosen palette; tap the name to open your palettes.
- A switch turns an option on or off. A choice opens a list.
- A palette setting (in Palette Map and Retro Dither) shows all of its colors. Presets lists old console and computer palettes such as PICO-8, Game Boy and Commodore 64. Import reads a palette file: a picture with up to 256 colors (bigger ones are reduced to 256), Photoshop .ase or .act, GIMP .gpl, .pal, .hex or Paint.NET .txt, like the palettes you can download from Lospec.
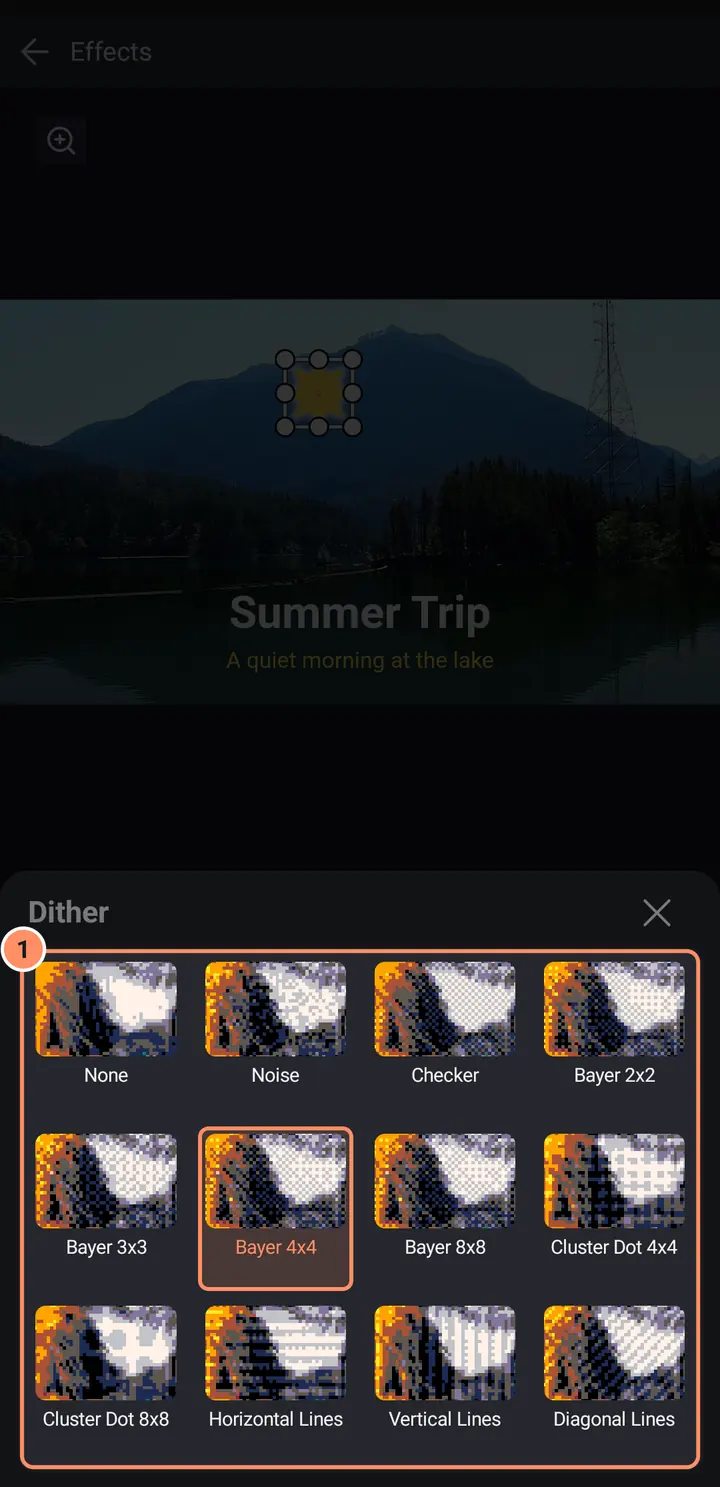
- The dither pattern of Retro Dither (Dither) and Palette Map (Dither Pattern) opens a sheet with a small sample picture of every pattern, so you can choose by how it looks. The chosen pattern has an orange frame. Swipe the grid up to see the rest.
- The three-dot menu has Effect Info, Reset to Defaults, Duplicate, Copy Effect and Paste Effect Values (when you copied one effect of the same kind).
- The trash can removes the effect. Tap the header to close it.
If the layer is a parent of other layers, a switch Apply to Children appears at the top of the effect (not for Move or Repeat effects).
The effect list
- The order matters: effects at the top are applied first. Hold the grip (Reorder) of a row and drag it to change the order. A short tap on the grip opens the effect, like a tap anywhere else on the row.
- The eye (Visibility) hides an effect without deleting it.
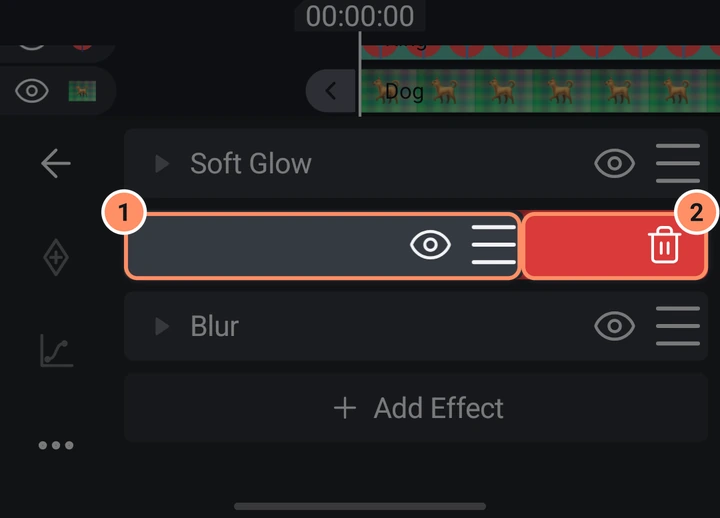
- Swipe a row to the left to delete that effect. Undo brings it back.
- More in the left column has Copy Effects (you tick which ones) and Paste Effect or Paste Effects, which adds the copied effects at the end of the list of the selected layer.
Effects on many layers at once
Select several layers (see Layer menus and multi-select) and tap Effects in the bottom bar. Add an effect to all opens the Effects Library and puts the effect you pick on every selected layer. Paste All Effects puts on every selected layer the effects you copied in one layer. Sound, camera and null layers are skipped.
Animate an effect
Every number, color and position in an effect can have keyframes. Open the effect, tap the name of the setting, put the playhead where you want, and tap the keyframe button. The easing button shapes the movement between keyframes. See Keyframes and easing.
Presets inside effects
Eight effects come with ready-made presets: Text Progress (Typewriter, Fade In by Word, Slide Up by Letter, Pop In), Text Transform (Wave, Spin Cascade), Text Randomizer (Scramble), Count Up/Down (Count Up), Text Shake (Nervous, Scared, Uneasy, Floaty, Wavy, Dizzy, Wobbly), Text Blips (Hero, Monster, Robot, Fast Talker, Typewriter), ASCII (Terminal, Binary Rain, Amber Monitor, Newspaper, Blocks, Line Art) and Particles (Snow, Sparks, Confetti, Bubbles, Dust, Hearts, Twinkle, Petals, Layer Fountain, Beat Confetti).
- On an open effect, tap Presets in its header. A list shows each preset with a small picture; tap one to use it.
- In the library, press and hold the effect: its page lists the presets under PRESET, with pictures.
- The star next to a preset marks it as a favorite. Favorite presets come first in the library's Favorite strip.
- Searching for a preset's name finds its effect.
These are different from the Presets tool of a layer, which keeps your own looks: see Assets, templates and presets.
Special kinds of effects
- Move effects (Auto-Shake, Oscillate, Swing, Spin, Random Displacement, Random Jitter, Pulse, Echo, Offset, Move Along Path, True Motion Blur) animate a layer by themselves. Parenting Helper and Scale Assist are also here: see below.
- Repeat effects make copies in a line, a circle, a grid, along a path or scattered. See Repeat: delay and random per copy below.
- 3D effects turn a layer into a cube, sphere, torus and other solids. The Rotate tab then controls the effect's rotation.
- Beat effects (Beat Blur, Beat Flash, Beat Glitch, Beat Glow, Beat Pulse, Beat RGB Split, Beat Rotate, Beat Shake and Beat Zoom) hit on every beat of the music. Select the music clip and tap Mark Beats in its tools or its layer menu first; without beat marks they follow the BPM setting. See Audio.
- Key effects (Chroma Key, Luma Key) remove a color or the dark and bright parts of a layer, for example a green screen.
- Text effects (Text Progress, Text Transform, Text Randomizer, Text Shake, Text Blips, Font Weight, Count Up/Down, Timecode, Text Along Path) animate text letter by letter. See Text and fonts.
- Audio effects work on sound: see Audio.
- AI tools (Remove Background, Reduce Noise) run on the phone: see AI tools.
- Other holds Copy Background, the adjustment layer: see below.
Crop, a Key effect, cuts the edges off a layer. Layers also have a Crop button, on page 2 of the tool grid, that shows the crop on the canvas: see Layer tools.
Particles
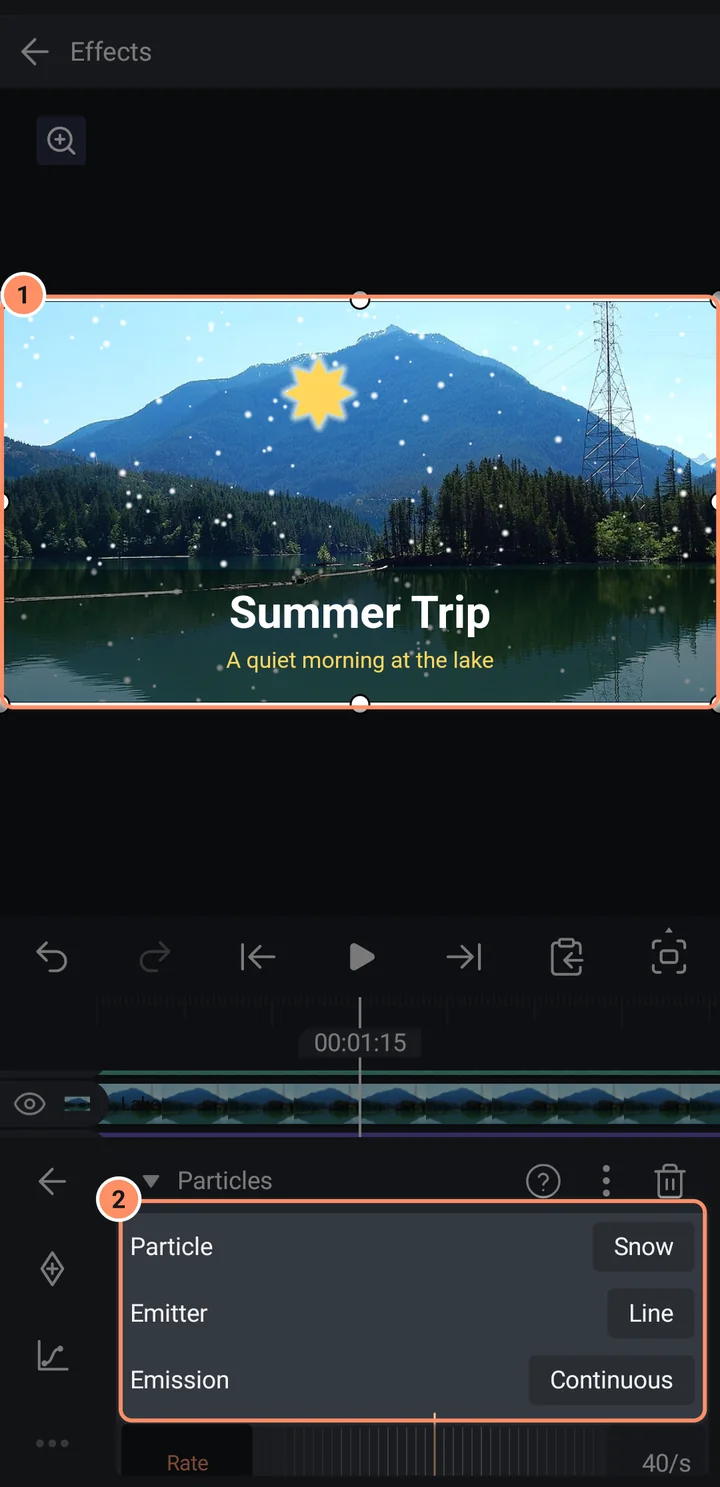
Particles (in Stylize) sends particles flying out of the layer. Particle picks what they are: Snow, Sparks, Confetti, Bubbles, Dust, Hearts, Stars, Petals or small copies of the Layer itself. Emitter is where they start: a Point, a Line, an Area or the Outline of the layer. Emission is when: Continuous (a Rate per second), Burst (a Count at the moment you choose) or On Beats (a burst on every beat of the music, which needs the beat marks described above). Further down are the Lifetime, Speed and Direction of the particles, the forces Gravity, Wind and Swirl, and their Size and Color. More Settings opens the fine controls. It has ten presets to start from (see Presets inside effects above).
With Depth switched on, particles also fly toward or away from the camera: Z Speed moves them in depth, Z Spread gives them different starting depths and Perspective sets how much smaller far particles look. They then also follow the layer's 3D rotation, and with Sort set to By piece each particle sorts by depth among the pieces of other 3D layers: see Camera layers and 3D.
3D Scatter, 3D Fracture and Video Feedback
3D Scatter (in 3D) turns the layer into a grid of small cubes, spheres, squares or circles that take the layer's colors. Grid Spacing and Piece Size set the grid, Grid Depth adds rows behind it, Scatter throws the pieces apart in 3D and Twist Angle turns the grid around the Twist Axis. The light settings shade the pieces.
3D Fracture (in 3D) breaks the layer into glass shards. Animate Progress from 0 (whole) to 1 (broken); Impact Point, Force, Gravity, Spin and Depth Push decide how the shards fly.
Both follow the layer's own 3D rotation, its parent's and the camera, and turn with it when it tilts or orbits. Their pieces sit in front of and behind each other. With Depth order on, the whole effect also sits in front of or behind other layers by its depth. With Sort set to By piece, its pieces also slot in between the pieces of other layers; Mix pieces with other layers on the effect card turns this off for one layer. Light layers shade the pieces. See Camera layers and 3D.
Video Feedback (in Repeat) draws the layer inside itself again and again, like a camera pointed at its own screen. Zoom, Rotation and Offset set each step; with Use Layer Transform on, moving, scaling or turning the layer steers the tunnel. Fade and Hue Shift change each copy, and Delay makes the inner copies follow the layer's animation a moment later.
Copy Background
Copy Background (in Other) turns a layer into an adjustment layer. It copies everything drawn below the layer, and the effects you add after it change that copy, so one set of effects changes all of the layers below at once. Put the layer above the ones you want to change. Mask To Layer keeps the change inside the layer's own shape, Mix brings the layer's own fill back and Effects Reach Outside lets later effects carry the copy past the layer's edges. It used to be called Adjustment Layer, and searching for "adjustment layer" still finds it. Projects that use it keep working.
ASCII
ASCII (in Stylize) turns any layer into text art made of letters and symbols. Size is measured on the layer, so the characters move, turn and scale with it. Pick the Characters (or type your own), keep the picture's colors or use one color, and add Edge Lines for outlines. See ASCII.
Repeat: delay and random per copy
Linear Repeat, Radial Repeat, Grid Repeat and Repeat Along Path have five settings that make each copy different:
- Delay per copy (-60 to 60 seconds) plays each copy's animation that much later than the copy before it, so a movement ripples through the copies. A negative value plays them earlier. It only shows when the layer is animated, for example with keyframes or a Move effect.
- Random Position, Random Rotation, Random Scale and Random Opacity move, turn, scale and fade each copy by a random amount, up to the value you set. Seed picks another random pattern.
When any of these five is used, a repeat makes at most 256 copies.
Parenting Helper and Scale Assist
Both are in Move. Parenting Helper changes how a child layer follows its parent: its scale and rotation can follow fully, stay Locked or follow by a Weight you set, and Auto Rotate turns the layer as it moves, like a rolling wheel. Scale Assist adds extra scale along X, Y, both, or X with Y the other way (a squash and stretch), and the layer's children follow the new size. See Parenting Helper and Scale Assist.
Tips
- If the preview gets slow with many effects, switch Preview Quality to Half or Quarter. The export is not affected.